> ## Documentation Index
> Fetch the complete documentation index at: https://student-213fb9fc.mintlify.site/llms.txt
> Use this file to discover all available pages before exploring further.
# Firecrawl MCP Server
> Model Context Protocol を通じて Firecrawl の API を利用する
[Firecrawl](https://github.com/firecrawl/firecrawl) を統合し、ウェブスクレイピング機能を提供する Model Context Protocol(MCP)サーバー実装です。MCP サーバーはオープンソースで、[GitHub](https://github.com/firecrawl/firecrawl-mcp-server) から入手できます。
## 機能
* Webスクレイピング、クロール、ディスカバリ
* 検索とコンテンツ抽出
* 自律エージェントによる深層リサーチ
* ブラウザセッション管理
* クラウドおよびセルフホストに対応
* ストリーミング対応のHTTPサポート
## インストール
リモートのホストURLを使用するか、サーバーをローカルで実行します。APIキーは [https://firecrawl.dev/app/api-keys](https://www.firecrawl.dev/app/api-keys) から取得してください。
### リモートホストのURL
```bash theme={null}
https://mcp.firecrawl.dev/{FIRECRAWL_API_KEY}/v2/mcp
```
### npx での実行
```bash theme={null}
env FIRECRAWL_API_KEY=fc-YOUR_API_KEY npx -y firecrawl-mcp
```
### 手動インストール
```bash theme={null}
npm install -g firecrawl-mcp
```
### Cursor 上での実行

#### 手動インストール
Cursor の設定 🖥️
注意: Cursor バージョン 0.45.6 以上が必要です
最新の設定手順は、MCP サーバーの構成に関する Cursor 公式ドキュメントをご参照ください:
[Cursor MCP Server Configuration Guide](https://docs.cursor.com/context/model-context-protocol#configuring-mcp-servers)
Cursor **v0.48.6** で Firecrawl MCP を構成するには
1. Cursor Settings を開く
2. Features > MCP Servers に移動
3. 「+ Add new global MCP server」をクリック
4. 次のコードを入力:
```json theme={null}
{
"mcpServers": {
"firecrawl-mcp": {
"command": "npx",
"args": ["-y", "firecrawl-mcp"],
"env": {
"FIRECRAWL_API_KEY": "YOUR-API-KEY"
}
}
}
}
```
Cursor **v0.45.6** で Firecrawl MCP を構成するには
1. Cursor Settings を開く
2. Features > MCP Servers に移動
3. 「+ Add New MCP Server」をクリック
4. 次を入力:
* Name: "firecrawl-mcp"(任意の名称でも可)
* Type: "command"
* Command: `env FIRECRAWL_API_KEY=your-api-key npx -y firecrawl-mcp`
> Windows を使用していて問題が発生する場合は、`cmd /c "set FIRECRAWL_API_KEY=your-api-key && npx -y firecrawl-mcp"` を試してください
`your-api-key` をお持ちの Firecrawl API キーに置き換えてください。まだお持ちでない場合はアカウントを作成し、[https://www.firecrawl.dev/app/api-keys](https://www.firecrawl.dev/app/api-keys) から取得できます。
追加後、MCP サーバー一覧を更新して新しいツールを確認してください。Composer Agent は適宜 Firecrawl MCP を自動的に使用しますが、ウェブスクレイピングの要件を記述することで明示的にリクエストすることも可能です。Command+L(Mac)で Composer を開き、送信ボタン横の「Agent」を選択してクエリを入力します。
### Windsurf での実行
次を `./codeium/windsurf/model_config.json` に追加します:
```json theme={null}
{
"mcpServers": {
"mcp-server-firecrawl": {
"command": "npx",
"args": ["-y", "firecrawl-mcp"],
"env": {
"FIRECRAWL_API_KEY": "YOUR_API_KEY"
}
}
}
}
```
### Streamable HTTP モードでの実行
デフォルトの stdio トランスポートではなく、ローカル環境で Streamable HTTP トランスポートを使ってサーバーを実行するには、次のようにします:
```bash theme={null}
env HTTP_STREAMABLE_SERVER=true FIRECRAWL_API_KEY=fc-YOUR_API_KEY npx -y firecrawl-mcp
```
次のURLを使用してください:[http://localhost:3000/v2/mcp](http://localhost:3000/v2/mcp) または [https://mcp.firecrawl.dev/\{FIRECRAWL\_API\_KEY}/v2/mcp](https://mcp.firecrawl.dev/\{FIRECRAWL_API_KEY}/v2/mcp)
### Smithery 経由でのインストール(レガシー)
[Smithery](https://smithery.ai/server/@mendableai/mcp-server-firecrawl) を使って Claude Desktop 用の Firecrawl を自動インストールするには:
```bash theme={null}
npx -y @smithery/cli install @mendableai/mcp-server-firecrawl --client claude
```
### VS Code での実行
ワンクリックでインストールするには、以下のインストールボタンのいずれかをクリックしてください。
[](https://insiders.vscode.dev/redirect/mcp/install?name=firecrawl\&inputs=%5B%7B%22type%22%3A%22promptString%22%2C%22id%22%3A%22apiKey%22%2C%22description%22%3A%22Firecrawl%20API%20Key%22%2C%22password%22%3Atrue%7D%5D\&config=%7B%22command%22%3A%22npx%22%2C%22args%22%3A%5B%22-y%22%2C%22firecrawl-mcp%22%5D%2C%22env%22%3A%7B%22FIRECRAWL_API_KEY%22%3A%22%24%7Binput%3AapiKey%7D%22%7D%7D) [](https://insiders.vscode.dev/redirect/mcp/install?name=firecrawl\&inputs=%5B%7B%22type%22%3A%22promptString%22%2C%22id%22%3A%22apiKey%22%2C%22description%22%3A%22Firecrawl%20API%20Key%22%2C%22password%22%3Atrue%7D%5D\&config=%7B%22command%22%3A%22npx%22%2C%22args%22%3A%5B%22-y%22%2C%22firecrawl-mcp%22%5D%2C%22env%22%3A%7B%22FIRECRAWL_API_KEY%22%3A%22%24%7Binput%3AapiKey%7D%22%7D%7D\&quality=insiders)
手動でインストールするには、VS Code のユーザー設定 (JSON) ファイルに次の JSON ブロックを追加します。`Ctrl + Shift + P` を押し、`Preferences: Open User Settings (JSON)` と入力して開きます。
```json theme={null}
{
"mcp": {
"inputs": [
{
"type": "promptString",
"id": "apiKey",
"description": "Firecrawl APIキー",
"password": true
}
],
"servers": {
"firecrawl": {
"command": "npx",
"args": ["-y", "firecrawl-mcp"],
"env": {
"FIRECRAWL_API_KEY": "${input:apiKey}"
}
}
}
}
}
```
必要に応じて、ワークスペース内の `.vscode/mcp.json` ファイルにこれを追加できます。そうすると、この設定を他の人と共有できるようになります。
```json theme={null}
{
"inputs": [
{
"type": "promptString",
"id": "apiKey",
"description": "Firecrawl API Key",
"password": true
}
],
"servers": {
"firecrawl": {
"command": "npx",
"args": ["-y", "firecrawl-mcp"],
"env": {
"FIRECRAWL_API_KEY": "${input:apiKey}"
}
}
}
}
```
**注意:** 一部のユーザーから、古いスキーマ形式で JSON を検証している VS Code の仕様が原因で、MCP サーバーを VS Code に追加する際に問題が発生するとの報告があります([microsoft/vscode#155379](https://github.com/microsoft/vscode/issues/155379))。
この問題は Firecrawl を含む複数の MCP ツールに影響します。
**回避策:** MCP サーバーが正しく読み込まれるようにするため、VS Code の JSON 検証を無効化してください。
参考: [directus/directus#25906 (comment)](https://github.com/directus/directus/issues/25906#issuecomment-3369169513)。
MCP サーバーは他の拡張機能経由で呼び出した場合は問題なく動作しますが、MCP サーバー一覧に直接登録しようとした場合にのみ、この問題が発生します。VS Code がスキーマ検証を更新し次第、その設定方法についてのガイダンスを追記する予定です。
### Claude Desktop での実行
Claude の設定ファイルに次を追加してください:
```json theme={null}
{
"mcpServers": {
"firecrawl": {
"url": "https://mcp.firecrawl.dev/v2/mcp",
"headers": {
"Authorization": "Bearer YOUR_API_KEY"
}
}
}
}
```
### Claude Code での実行
Claude Code の CLI を使って Firecrawl MCP サーバーを追加します:
```bash theme={null}
claude mcp add firecrawl -e FIRECRAWL_API_KEY=your-api-key -- npx -y firecrawl-mcp
```
### Google Antigravity 上での実行
Google Antigravity では、Agent インターフェースから直接 MCP サーバーを設定できます。
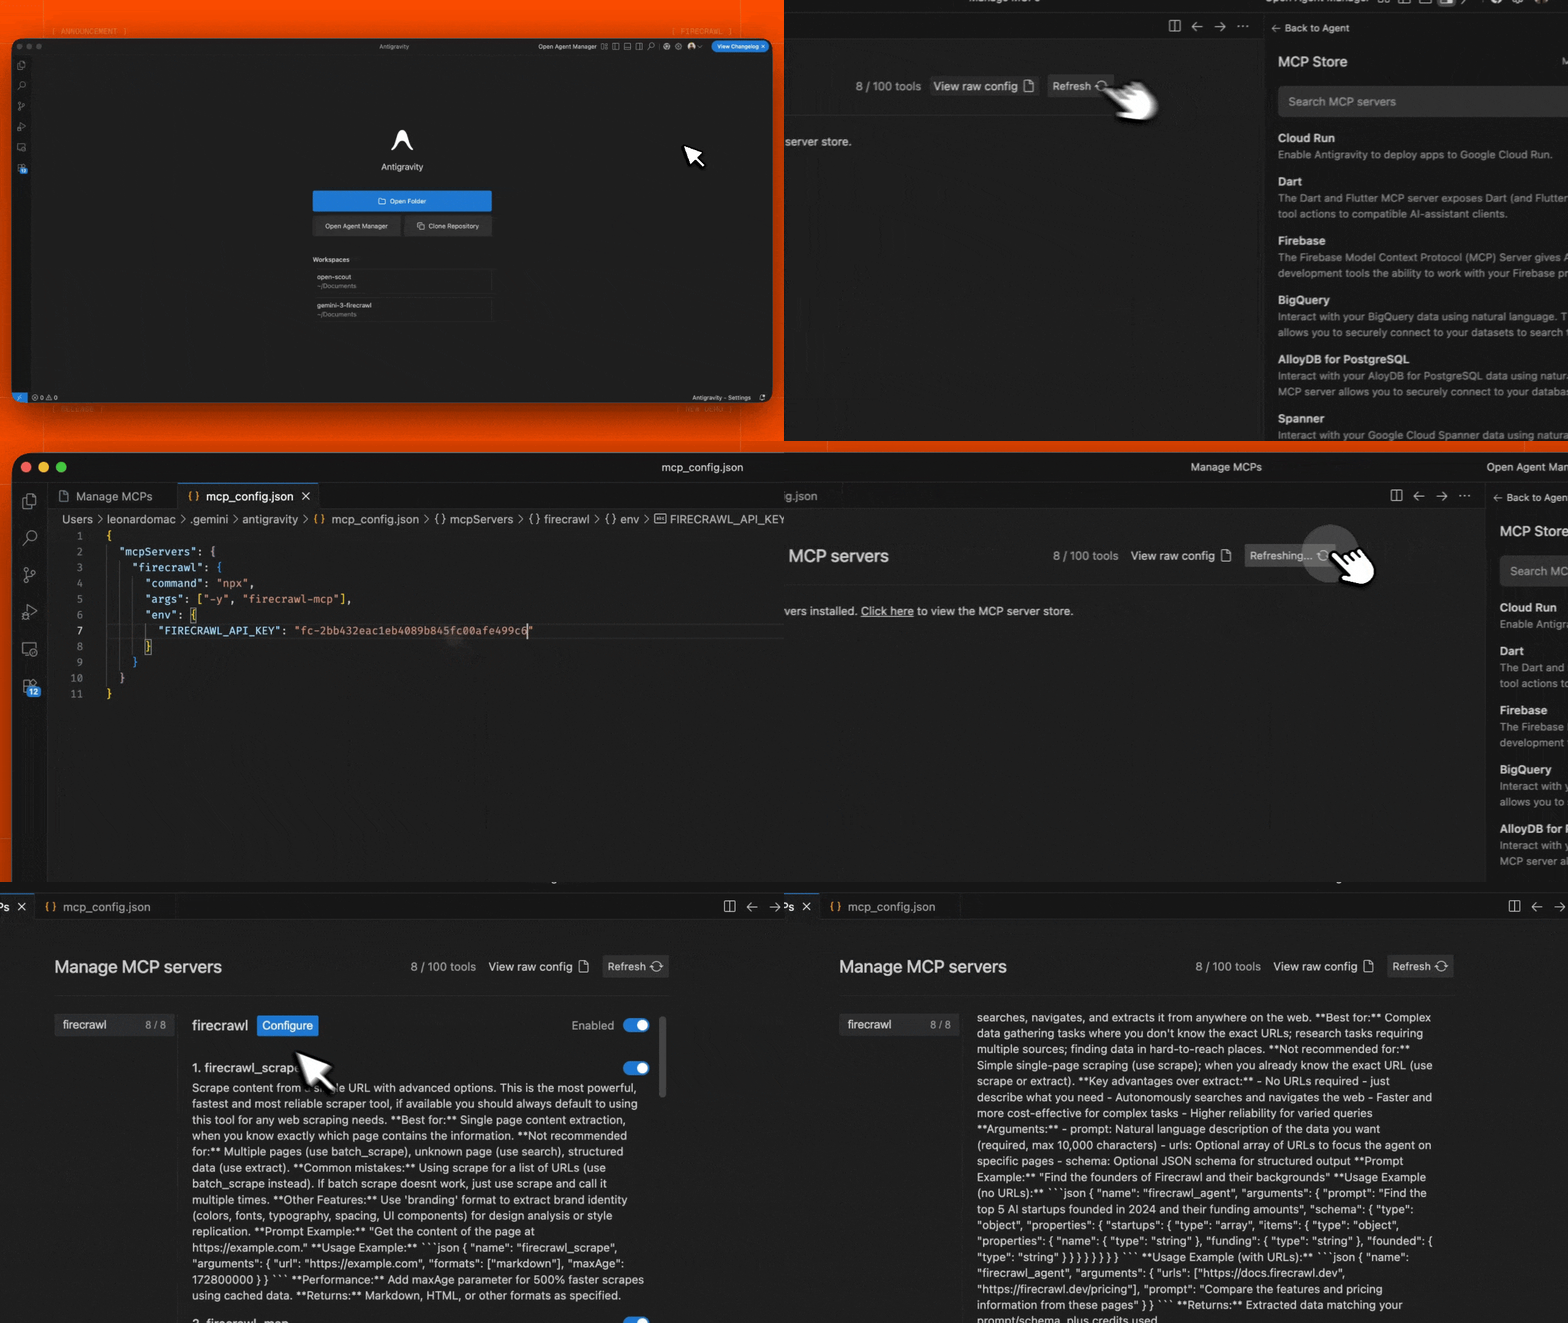 1. Editor または Agent Manager ビューで Agent サイドバーを開きます
2. "..."(More Actions)メニューをクリックし、**MCP Servers** を選択します
3. **View raw config** を選択して、ローカルの `mcp_config.json` ファイルを開きます
4. 以下の設定を追加します:
```json theme={null}
{
"mcpServers": {
"firecrawl": {
"command": "npx",
"args": ["-y", "firecrawl-mcp"],
"env": {
"FIRECRAWL_API_KEY": "YOUR_FIRECRAWL_API_KEY"
}
}
}
}
```
5. ファイルを保存し、Antigravity MCP インターフェースで **Refresh** をクリックして、新しいツールが表示されることを確認します。
`YOUR_FIRECRAWL_API_KEY` を、[https://firecrawl.dev/app/api-keys](https://www.firecrawl.dev/app/api-keys) から取得した API キーに置き換えてください。
1. Editor または Agent Manager ビューで Agent サイドバーを開きます
2. "..."(More Actions)メニューをクリックし、**MCP Servers** を選択します
3. **View raw config** を選択して、ローカルの `mcp_config.json` ファイルを開きます
4. 以下の設定を追加します:
```json theme={null}
{
"mcpServers": {
"firecrawl": {
"command": "npx",
"args": ["-y", "firecrawl-mcp"],
"env": {
"FIRECRAWL_API_KEY": "YOUR_FIRECRAWL_API_KEY"
}
}
}
}
```
5. ファイルを保存し、Antigravity MCP インターフェースで **Refresh** をクリックして、新しいツールが表示されることを確認します。
`YOUR_FIRECRAWL_API_KEY` を、[https://firecrawl.dev/app/api-keys](https://www.firecrawl.dev/app/api-keys) から取得した API キーに置き換えてください。
### n8n 上での実行
n8n で Firecrawl MCP サーバーに接続するには:
1. [https://firecrawl.dev/app/api-keys](https://www.firecrawl.dev/app/api-keys) から Firecrawl APIキーを取得する
2. n8n のワークフローで **AI Agent** ノードを追加する
3. AI Agent の設定で、新しい **Tool** を追加する
4. ツールタイプとして **MCP Client Tool** を選択する
5. MCP サーバーのエンドポイントを入力する(`{YOUR_FIRECRAWL_API_KEY}` を実際の APIキーに置き換える):
```
https://mcp.firecrawl.dev/{あなたのFirecrawl APIキー}/v2/mcp
```
6. **Server Transport** を **HTTP Streamable** に設定します
7. **Authentication** を **None** に設定します
8. **Tools to include** では **All**、**Selected**、または **All Except** を選択できます。これにより Firecrawl のツール(scrape、crawl、map、search、extract など)が利用可能になります。
セルフホスト環境でデプロイする場合は、npx で MCP server を実行し、HTTP transport モードを有効にします:
```bash theme={null}
env HTTP_STREAMABLE_SERVER=true \
FIRECRAWL_API_KEY=fc-YOUR_API_KEY \
FIRECRAWL_API_URL=YOUR_FIRECRAWL_INSTANCE \
npx -y firecrawl-mcp
```
これによりサーバーが `http://localhost:3000/v2/mcp` で起動し、n8n のワークフロー内でエンドポイントとして利用できます。n8n では HTTP トランスポートが必要なため、環境変数 `HTTP_STREAMABLE_SERVER=true` を設定する必要があります。
## 設定
### 環境変数
#### Cloud APIで必須
* `FIRECRAWL_API_KEY`: Firecrawl のAPIキー
* Cloud API(デフォルト)を使用する場合に必須
* `FIRECRAWL_API_URL` を指定したセルフホスト環境では任意
* `FIRECRAWL_API_URL`(任意): セルフホスト環境向けのカスタムAPIエンドポイント
* 例: `https://firecrawl.your-domain.com`
* 指定しない場合は Cloud API が使用されます(APIキーが必要)
#### 省略可能な設定
##### リトライ設定
* `FIRECRAWL_RETRY_MAX_ATTEMPTS`: リトライの最大試行回数(既定値: 3)
* `FIRECRAWL_RETRY_INITIAL_DELAY`: 初回リトライまでの遅延時間(ミリ秒)(既定値: 1000)
* `FIRECRAWL_RETRY_MAX_DELAY`: リトライ間の最大遅延時間(ミリ秒)(既定値: 10000)
* `FIRECRAWL_RETRY_BACKOFF_FACTOR`: 指数バックオフの係数(既定値: 2)
##### クレジット使用量の監視
* `FIRECRAWL_CREDIT_WARNING_THRESHOLD`: クレジット使用量の警告閾値(既定: 1000)
* `FIRECRAWL_CREDIT_CRITICAL_THRESHOLD`: クレジット使用量のクリティカル閾値(既定: 100)
### 設定例
カスタムのリトライ設定とクレジット監視を備えたクラウド API の利用例:
```bash theme={null}
# クラウド API 用に必須
export FIRECRAWL_API_KEY=your-api-key
# 任意のリトライ設定
export FIRECRAWL_RETRY_MAX_ATTEMPTS=5 # 最大リトライ回数を増やす
export FIRECRAWL_RETRY_INITIAL_DELAY=2000 # 初期遅延は 2 秒
export FIRECRAWL_RETRY_MAX_DELAY=30000 # 最大遅延は 30 秒
export FIRECRAWL_RETRY_BACKOFF_FACTOR=3 # より強めのバックオフ
# 任意のクレジット監視
export FIRECRAWL_CREDIT_WARNING_THRESHOLD=2000 # 2000 クレジットで警告
export FIRECRAWL_CREDIT_CRITICAL_THRESHOLD=500 # 500 クレジットで重大アラート
```
セルフホスト環境の場合:
```bash theme={null}
# 自前ホスティングで必須
export FIRECRAWL_API_URL=https://firecrawl.your-domain.com
# 自前ホスティング向けの任意の認証
export FIRECRAWL_API_KEY=your-api-key # インスタンスで認証が必要な場合
# リトライ設定のカスタマイズ
export FIRECRAWL_RETRY_MAX_ATTEMPTS=10
export FIRECRAWL_RETRY_INITIAL_DELAY=500 # より短い間隔からリトライ開始
```
### Claude Desktop でのカスタム設定
次の内容を `claude_desktop_config.json` に追加します:
```json theme={null}
{
"mcpServers": {
"mcp-server-firecrawl": {
"command": "npx",
"args": ["-y", "firecrawl-mcp"],
"env": {
"FIRECRAWL_API_KEY": "YOUR_API_KEY_HERE",
"FIRECRAWL_RETRY_MAX_ATTEMPTS": "5",
"FIRECRAWL_RETRY_INITIAL_DELAY": "2000",
"FIRECRAWL_RETRY_MAX_DELAY": "30000",
"FIRECRAWL_RETRY_BACKOFF_FACTOR": "3",
"FIRECRAWL_CREDIT_WARNING_THRESHOLD": "2000",
"FIRECRAWL_CREDIT_CRITICAL_THRESHOLD": "500"
}
}
}
}
```
### システム構成
サーバーには、環境変数で設定可能な構成パラメータがいくつかあります。設定しなかった場合のデフォルト値は次のとおりです。
```typescript theme={null}
const CONFIG = {
retry: {
maxAttempts: 3, // レート制限されたリクエストの再試行回数
initialDelay: 1000, // 最初の再試行前の初期遅延(ミリ秒)
maxDelay: 10000, // 再試行間の最大遅延(ミリ秒)
backoffFactor: 2, // 指数バックオフの倍率
},
credit: {
warningThreshold: 1000, // クレジット使用量がこのレベルに達した際に警告
criticalThreshold: 100, // クレジット使用量がこのレベルに達した際に重大アラート
},
};
```
これらの設定は次の内容を制御します:
1. **リトライ動作**
* レート制限により失敗したリクエストを自動的に再試行します
* API を過負荷にしないよう、指数バックオフを使用します
* 例:デフォルト設定では、以下のタイミングでリトライが行われます
* 1回目のリトライ:1秒の待機
* 2回目のリトライ:2秒の待機
* 3回目のリトライ:4秒の待機(maxDelay で上限が設定されます)
2. **クレジット使用状況の監視**
* クラウド API 利用時の API クレジット消費量を追跡します
* 指定したしきい値で警告を出します
* 想定外のサービス中断を防ぐのに役立ちます
* 例:デフォルト設定では
* 残り 1000 クレジットで警告
* 残り 100 クレジットでクリティカルアラート
### レート制限とバッチ処理
サーバーは、Firecrawl の組み込みのレート制限およびバッチ処理機能を利用しています:
* 指数バックオフ付きの自動レート制限処理
* バッチ処理のための効率的な並列実行
* スマートなリクエストのキューイングおよびスロットリング
* 一時的なエラーに対する自動再試行
## 利用可能なツール
### 1. スクレイプツール(`firecrawl_scrape`)
高度なオプションを使って、単一のURLからコンテンツをスクレイピングします。
```json theme={null}
{
"name": "firecrawl_scrape",
"arguments": {
"url": "https://example.com",
"formats": ["markdown"],
"onlyMainContent": true,
"waitFor": 1000,
"mobile": false,
"includeTags": ["article", "main"],
"excludeTags": ["nav", "footer"],
"skipTlsVerification": false
}
}
```
### 2. Map Tool (`firecrawl_map`)
ウェブサイトをマッピングして、サイト上でインデックスされているすべてのURLを洗い出します。
```json theme={null}
{
"name": "firecrawl_map",
"arguments": {
"url": "https://example.com",
"search": "blog",
"sitemap": "include",
"includeSubdomains": false,
"limit": 100,
"ignoreQueryParameters": true
}
}
```
#### Map Tool オプション:
* `url`: マッピング対象となるウェブサイトのベース URL
* `search`: URL をフィルタリングするための任意の検索語句
* `sitemap`: サイトマップの利用方法を制御 - "include"、"skip"、"only" のいずれか
* `includeSubdomains`: マッピング時にサブドメインを含めるかどうか
* `limit`: 返す URL の最大件数
* `ignoreQueryParameters`: マッピング時にクエリパラメータを無視するかどうか
**最適な用途:** 何をスクレイピングするか決める前にウェブサイト上の URL を探索する場合や、サイト内の特定セクションを見つける場合。
**戻り値:** サイト上で検出された URL の配列。
### 3. Search Tool (`firecrawl_search`)
ウェブを検索し、必要に応じて検索結果から内容を抽出します。
```json theme={null}
{
"name": "firecrawl_search",
"arguments": {
"query": "検索クエリ",
"limit": 5,
"location": "United States",
"tbs": "qdr:m",
"scrapeOptions": {
"formats": ["markdown"],
"onlyMainContent": true
}
}
}
```
#### Search ツールのオプション:
* `query`: 検索クエリ文字列(必須)
* `limit`: 返す結果の最大件数
* `location`: 検索結果の地理的な場所
* `tbs`: 時間ベースの検索フィルター(例: `qdr:d` 過去1日、`qdr:w` 過去1週間、`qdr:m` 過去1か月)
* `filter`: 追加の検索フィルター
* `sources`: 検索対象とするソース種別の配列(`web`、`images`、`news`)
* `scrapeOptions`: 検索結果ページをスクレイピングする際のオプション
* `enterprise`: enterprise オプションの配列(`default`、`anon`、`zdr`)
### 4. Crawl Tool (`firecrawl_crawl`)
高度なオプションを指定して非同期クロールを開始します。
```json theme={null}
{
"name": "firecrawl_crawl",
"arguments": {
"url": "https://example.com",
"maxDiscoveryDepth": 2,
"limit": 100,
"allowExternalLinks": false,
"deduplicateSimilarURLs": true
}
}
```
### 5. クロールのステータスを確認 (`firecrawl_check_crawl_status`)
クロールジョブのステータスを確認します。
```json theme={null}
{
"name": "firecrawl_check_crawl_status",
"arguments": {
"id": "550e8400-e29b-41d4-a716-446655440000"
}
}
```
**戻り値:** クロールジョブのステータスおよび進捗状況(可能であれば結果も含む)。
LLM の機能を使用して、Web ページから構造化情報を抽出します。クラウド型 AI とセルフホスト型 LLM の両方での抽出に対応しています。
```json theme={null}
{
"name": "firecrawl_extract",
"arguments": {
"urls": ["https://example.com/page1", "https://example.com/page2"],
"prompt": "Extract product information including name, price, and description",
"schema": {
"type": "object",
"properties": {
"name": { "type": "string" },
"price": { "type": "number" },
"description": { "type": "string" }
},
"required": ["name", "price"]
},
"allowExternalLinks": false,
"enableWebSearch": false,
"includeSubdomains": false
}
}
```
レスポンス例:
```json theme={null}
{
"content": [
{
"type": "text",
"text": {
"name": "Example Product",
"price": 99.99,
"description": "This is an example product description"
}
}
],
"isError": false
}
```
* `urls`: 情報を抽出する対象の URL 配列
* `prompt`: LLM による抽出に使用するカスタムプロンプト
* `schema`: 構造化データ抽出用の JSON スキーマ
* `allowExternalLinks`: 外部リンクからの抽出を許可するかどうか
* `enableWebSearch`: 追加のコンテキストのためにウェブ検索を有効にするかどうか
* `includeSubdomains`: 抽出対象にサブドメインを含めるかどうか
セルフホスト型インスタンスを使用する場合、抽出処理には構成済みの LLM が使用されます。クラウド API の場合は、Firecrawl のマネージド LLM サービスが使用されます。
### 7. Agent Tool (`firecrawl_agent`)
インターネットを自律的に閲覧し、情報を検索し、ページ間を移動し、クエリに基づいて構造化データを抽出する自律型のウェブリサーチエージェントです。非同期で動作し、まずジョブ ID を即座に返し、その後 `firecrawl_agent_status` をポーリングして完了を確認し、結果を取得します。
```json theme={null}
{
"name": "firecrawl_agent",
"arguments": {
"prompt": "Find the top 5 AI startups founded in 2024 and their funding amounts",
"schema": {
"type": "object",
"properties": {
"startups": {
"type": "array",
"items": {
"type": "object",
"properties": {
"name": { "type": "string" },
"funding": { "type": "string" },
"founded": { "type": "string" }
}
}
}
}
}
}
}
```
エージェントに重点的に処理させたい特定のURLを指定することもできます:
```json theme={null}
{
"name": "firecrawl_agent",
"arguments": {
"urls": ["https://docs.firecrawl.dev", "https://firecrawl.dev/pricing"],
"prompt": "Compare the features and pricing information from these pages"
}
}
```
#### Agent Tool Options:
* `prompt`: 取得したいデータの内容を自然言語で記述したもの(必須、最大 10,000 文字)
* `urls`: エージェントを特定のページにフォーカスさせるためのオプションの URL 配列
* `schema`: 構造化出力のためのオプションの JSON スキーマ
**Best for:** 正確な URL がわからない複雑なリサーチタスク、複数ソースからのデータ収集、ウェブ全体に散在する情報の検索、通常のスクレイピングでは失敗しがちな JavaScript 依存度の高い SPA からのデータ抽出。
**Returns:** ステータス確認用の Job ID。`firecrawl_agent_status` を使って結果をポーリングします。
### 8. エージェントのステータスを確認 (`firecrawl_agent_status`)
エージェントジョブのステータスを確認し、完了時に結果を取得します。15〜30秒ごとにポーリングし、リクエストが失敗したと見なす前に少なくとも2〜3分間はポーリングを続けてください。
```json theme={null}
{
"name": "firecrawl_agent_status",
"arguments": {
"id": "550e8400-e29b-41d4-a716-446655440000"
}
}
```
#### エージェントステータスのオプション:
* `id`: `firecrawl_agent` から返されるエージェントジョブ ID(必須)
**取り得るステータス:**
* `processing`: エージェントがまだ調査中 — ポーリングを継続
* `completed`: 調査完了 — レスポンスに抽出データが含まれる
* `failed`: エラーが発生
**戻り値:** エージェントジョブのステータス、進行状況、および(完了している場合は)結果。
### 9. ブラウザーセッションの作成 (`firecrawl_browser_create`)
CDP(Chrome DevTools Protocol)経由でコードを実行するための永続的なブラウザーセッションを作成します。
```json theme={null}
{
"name": "firecrawl_browser_create",
"arguments": {
"ttl": 120,
"activityTtl": 60
}
}
```
#### Browser Create オプション:
* `ttl`: セッションの合計有効期間(秒単位、30〜3600、省略可)
* `activityTtl`: アイドル状態のタイムアウト(秒単位、10〜3600、省略可)
**最適な用途:** 実ブラウザページとやり取りするコード(Python/JS)の実行、複数ステップにわたるブラウザ自動化、複数回のツール呼び出しをまたいで維持されるプロファイル付きセッション。
**戻り値:** セッション ID、CDP URL、ライブビュー用 URL。
### 10. ブラウザでコードを実行する (`firecrawl_browser_execute`)
アクティブなブラウザセッション内でコードを実行できます。agent-browser のコマンド(Bash)、Python、または JavaScript をサポートします。
```json theme={null}
{
"name": "firecrawl_browser_execute",
"arguments": {
"sessionId": "session-id-here",
"code": "agent-browser open https://example.com",
"language": "bash"
}
}
```
Playwright を使った Python のコード例:
```json theme={null}
{
"name": "firecrawl_browser_execute",
"arguments": {
"sessionId": "session-id-here",
"code": "await page.goto('https://example.com')\ntitle = await page.title()\nprint(title)",
"language": "python"
}
}
```
#### ブラウザー実行オプション:
* `sessionId`: ブラウザーセッション ID(必須)
* `code`: 実行するコード(必須)
* `language`: `bash`、`python`、または `node`(任意、省略時は `bash`)
**よく使う agent-browser コマンド(bash):**
* `agent-browser open ` -- 指定した URL に移動
* `agent-browser snapshot` -- クリック可能な参照付きのアクセシビリティツリーを取得
* `agent-browser click @e5` -- スナップショットの参照を指定して要素をクリック
* `agent-browser type @e3 "text"` -- 要素にテキストを入力
* `agent-browser screenshot [path]` -- スクリーンショットを撮影
* `agent-browser scroll down` -- ページを下方向にスクロール
* `agent-browser wait 2000` -- 2 秒待機
**戻り値:** stdout、stderr、終了コードを含む実行結果。
### 11. ブラウザセッションの削除 (`firecrawl_browser_delete`)
ブラウザセッションを削除します。
```json theme={null}
{
"name": "firecrawl_browser_delete",
"arguments": {
"sessionId": "session-id-here"
}
}
```
#### ブラウザ削除オプション:
* `sessionId`: 破棄するブラウザセッションID(必須)
**戻り値:** 成功を示す確認。
### 12. ブラウザーセッションの一覧 (`firecrawl_browser_list`)
ブラウザーセッションを一覧表示し、必要に応じてステータスでフィルタリングできます。
```json theme={null}
{
"name": "firecrawl_browser_list",
"arguments": {
"status": "active"
}
}
```
#### ブラウザーリストのオプション:
* `status`: セッションのステータスでフィルタリングします -- `active` または `destroyed`(任意)
**戻り値:** ブラウザーセッションの配列を返します。
## ログシステム
サーバーには包括的なログ機能があります:
* 操作のステータスと進捗
* パフォーマンス指標
* クレジット使用状況の監視
* レート制限のトラッキング
* エラー状況
ログメッセージの例:
```
[INFO] Firecrawl MCP Server initialized successfully
[INFO] URL のスクレイピングを開始: https://example.com
[INFO] Starting crawl for URL: https://example.com
[WARNING] Credit usage has reached warning threshold
[ERROR] Rate limit exceeded, retrying in 2s...
```
## エラーハンドリング
サーバーは堅牢なエラーハンドリング機能を提供します:
* 一時的なエラーに対する自動リトライ
* バックオフを伴うレート制限への対応
* 詳細なエラーメッセージ
* クレジット使用量に関する警告
* ネットワーク障害への耐性
エラーレスポンスの例:
```json theme={null}
{
"content": [
{
"type": "text",
"text": "Error: Rate limit exceeded. Retrying in 2 seconds..."
}
],
"isError": true
}
```
## 開発
```bash theme={null}
# 依存関係のインストール
npm install
# ビルド
npm run build
# テストの実行
npm test
```
### コントリビュート方法
1. リポジトリをフォークする
2. 機能ブランチを作成する
3. テストを実行する: `npm test`
4. プルリクエストを作成して送信する
### 貢献者への感謝
初期実装にご尽力いただいた [@vrknetha](https://github.com/vrknetha)、[@cawstudios](https://caw.tech) に感謝します。
ホスティングしていただいた MCP.so と Klavis AI、ならびに当社サーバーの統合にご協力いただいた [@gstarwd](https://github.com/gstarwd)、[@xiangkaiz](https://github.com/xiangkaiz)、[@zihaolin96](https://github.com/zihaolin96) に感謝します。
## ライセンス
MIT ライセンス — 詳細は LICENSE ファイルをご覧ください